How to Install PowerDNS, MySQL, and Poweradmin on Almalinux 8?
PowerDNS is a free open source authoritative name server that can be used instead of BIND DNS. It performs better and uses less memory. Unlike recursive name servers that get records from other servers, PowerDNS provides records directly. This guide will show you how to install PowerDNS, MariaDB, and PowerDNS-Admin on AlmaLinux 8.
PowerDNS and Poweradmin Requirements
- PHP 8.1
- PHP intl extension
- PHP gettext extension
- PHP openssl extension
- PHP pdo extension
- PHP pdo-mysql, pdo-pgsql or pdo-sqlite extension
- PHP ldap extension (optional)
- MySQL 5.7.x/8.x, MariaDB, PostgreSQL or SQLite database
- PowerDNS authoritative server 4.0.0+
Step by Step Guide
Disable SELinux
SELinux can interfere with installation scripts and needs to be disabled. Disable SELinux using the step by step guide, and then move to the next step.
Install PHP 8.1
Use the step by step guide to install PHP 8.1 on AlmaLinux, and then move to the next step.
Install MySQL 8
Use the step by step guide to install MySQL 8 on AlmaLinux, and then move to the next step.
Install PowerDNS
Install PowerDNS and the PowerDNS MySQL backend using the following command.
sudo yum install pdns pdns-backend-mysql
Start PowerDNS service and enable it to start on boot using the following commands.
sudo systemctl start pdns

sudo systemctl enable pdns
PowerDNS is now installed and running. You can confirm status using the command below. You should see the word active in green color.
sudo systemctl status pdns
Configure PowerDNS
The default PowerDNS configuration file is "/etc/pdns/pdns.conf". Open the file with your favorite editor, using "vi" as an example.
vi /etc/pdns/pdns.conf
By default, PowerDNS use bind as a backend. We need to disable this by commenting the line "launch=bind" and allow MySQL backend configuration.
#launch=bind
launch=gmysql
gmysql-host=localhost
gmysql-user=pdns
gmysql-password=dbpassword
gmysql-dbname=powerdns
Save the changes and close the file. If you are using "vi" text editor, save changes by pressing colon button ":" and then "wq". PowerDNS service must be restarted for the changes to take effect. We are going to restart PowerDNS later in this guide.
Download the PowerDNS schema, create the PowerDNS database and import the PowerDNS schema. Use the following commands to download the PowerDNS schema.
cd ~/
wget http://github.com/PowerDNS/pdns/blob/master/modules/gmysqlbackend/schema.mysql.sql
Create the PowerDNS database, connect to the MySQL server using the MySQL client and authenticate using the command below.
mysql -u root -p
Once authenticated, type the following command to create the PowerDNS database.
create database powerdns;
Create the PowerDNS user
create user 'pdns' identified by 'dbpassword';
Press Enter on your keyboard.
grant all privileges on powerdns.* to 'pdns'@'localhost' identified by 'dbpassword';
Press Enter on your keyboard.
flush privileges;
With each successful MySQL command, you should see the following:
Query OK, 0 rows affected (0.001 sec)
This indicates that the MySQL query has been accepted by the server. Now that the user has been created, it is time to import the MySQL Schema into the powerdns database that was created in earlier steps. Exit the MySQL database by typing exit and pressing the Enter key on the keyboard.
Make sure you write this command in the same location you downloaded the schema file. Use "cd ~/" to go to the user's home directory where the file was downloaded. Use the following command "mysql -u username -p database_name < file.sql" to import the MySQL schema. Replace the variables with the actual data as shown below.
cd ~/
mysql -u pdns -p powerdns < schema.mysql.sql
Type the password to authenticate and press the Enter key on your keyboard. If the login was successful, then the database schema is now imported. It is now time to restart PowerDNS for the changes to take effect.
sudo systemctl restart pdns
PowerDNS is now running. You can confirm status using the command below. You should see the word active in green color.
sudo systemctl status pdns
Install Poweradmin
Install Poweradmin using the following steps.
Download poweradmin from the official repository on Github using the following commands.
cd ~/
wget http://github.com/poweradmin/poweradmin/archive/refs/tags/v3.6.1.tar.gz
Now extract the archived file and give it a new name. We will name is poweradmin in this example.
tar xvf v3.6.1.tar.gz
mv v3.6.1/ cd /var/www/html/poweradmin/
If the firewall is active, you need to allow access to the http ports. Use the following command to check if the firewall is active. If it is active, you will see the word active appear in green color.
sudo systemctl status firewalld
Allow HTTP and HTTPS protocols through the firewall using the following command.
sudo firewall-cmd --add-service={http,https} --permanent
sudo firewall-cmd –reload
Poweradmin can be accessed with the following link. Make sure it starts with http, because you do not have an SSL certificate installed.
http://"Server IP address"/poweradmin/install
Follow the steps in the installer page:
- Choose your language and click go to step 2.
- Read the guide lines and click go to step 3.
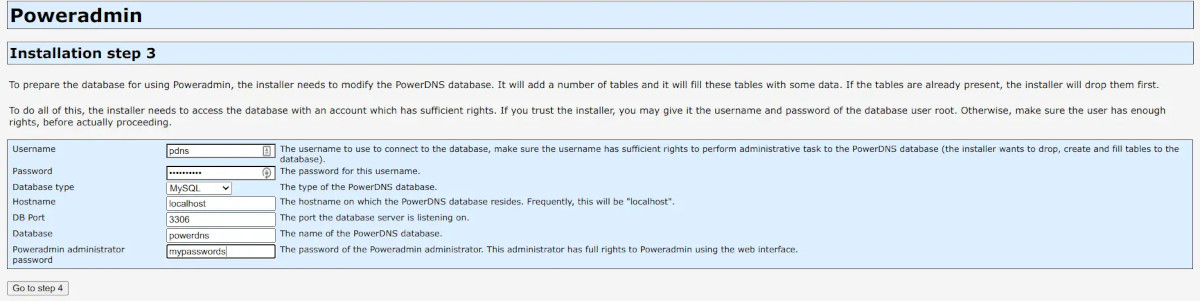
- Use the same username and password that you created while while configuring the PowerDNS database. Choose a password for the Poweradmin web interface and click go to step 4.
- Create a user with limited privileges by choosing a username and password, example "pauser". Type the primary and secondary nameservers you plan to use, example ns1.example.com ns2.example.com and click go to step 5.
- You will have to go to terminal and run mysql commands to grand the user the correct privileges. We will do this later on, click go to step 6.
- This step generates the configuration file, to copy it and create it on terminal. We will do that later on, keep reading.
Run the following commands to complete step 5.
mysql -u root -p
Type the mysql password that you created when you installed mysql using the step by step guide to install MySQL 8 on AlmaLinux. Type the following mysql command below and replace "pauser" with your actual username.
GRANT SELECT, INSERT, UPDATE, DELETE ON powerdns.* TO 'pauser'@'localhost' IDENTIFIED BY 'mypassword'
To complete step number 6, you must create the configuration file. Run the following commands on terminal.
cd /var/www/html/poweradmin

vi inc/config.inc.php
Press the insert button on the keyboard to be able to input text, then paste the contents of the generated configuration in step 6. It should look something like this. Do not forget to replace the username and password with the actual values.
<?php
$db_host                = 'localhost';
$db_user                = 'pauser';
$db_pass                = 'mypassword';
$db_name                = 'powerdns';
$db_type                = 'mysql';
$db_layer               = 'PDO';
$session_key            = '=tZ(x@{yxUEsxcxA$FxT$~Ks%2B#JmrRM2@qxHK$j7T1ha';
$iface_lang             = 'en_EN';
$dns_hostmaster         = 'hostmaster.example.com';
$dns_ns1                = 'ns1.example.com';
$dns_ns2                = 'ns2.example.com';
Press escape button to exit input mode, then save the files by pressing ":" and then "wq" and press the return/enter key to save and exit the vi editor. Open the browser again and click go to step 7.
It will now say that you have finished the configuration. You must run some commands on terminal to begin using poweradmin. You must remove the poweradmin install directory, this is important to secure the poweradmin installation.
cd /var/www/html/poweradmin
sudo cp install/htaccess.dist .htaccess
sudo rm -rf /var/www/html/poweradmin/install
Go back to your browser, replace the server IP text with the server IP and open the following link. Make sure it starts with http, because you do not have an SSL certificate installed.
http://"Server IP address"/poweradmin
Login with user ‘admin’ and the password you had set for the admin user and click GO. You should now see a page with a welcome message.
Congratulations you have completed this guide, and successfully installed PowerDNS and Poweradmin.
Related Categories:
Articles Sharing the Same Category
- How to Generate OpenVPN Client Configuration Files?
- How to SFTP to a server with a private key?
- CSF Firewall Whitelist an IP Address IN CLI
- How to Change ProFTPD Passive Ports and Make the Configuration Persistent?
- Install MySQL 8 on AlmaLinux 8